How to automate social media with n8n, AI and PostFast (Download Workflow)
Automating social media should be easy. Self-hosted tools like n8n allowed us to have creative freedom.
How to automate social media scheduling with AI. I've been pretty big advocate of automation, and this is one of the reasons I decided to try to free my own life from things that could be done without me.
This is one of the reasons I started one of my projects, as I just wanted to schedule everything through an API with n8n.
In this article, I'll walk you through in a simple way how to set up an n8n integration (mine is self-hosted on coolify) and automate a big part of your social media posting.
If you're impatient or don't care about the process, you can just download the workflow. Okay, let's dive in.
Getting started (Preparation)
First thing is we need to create credentials for PostFast, and for OpenAI.
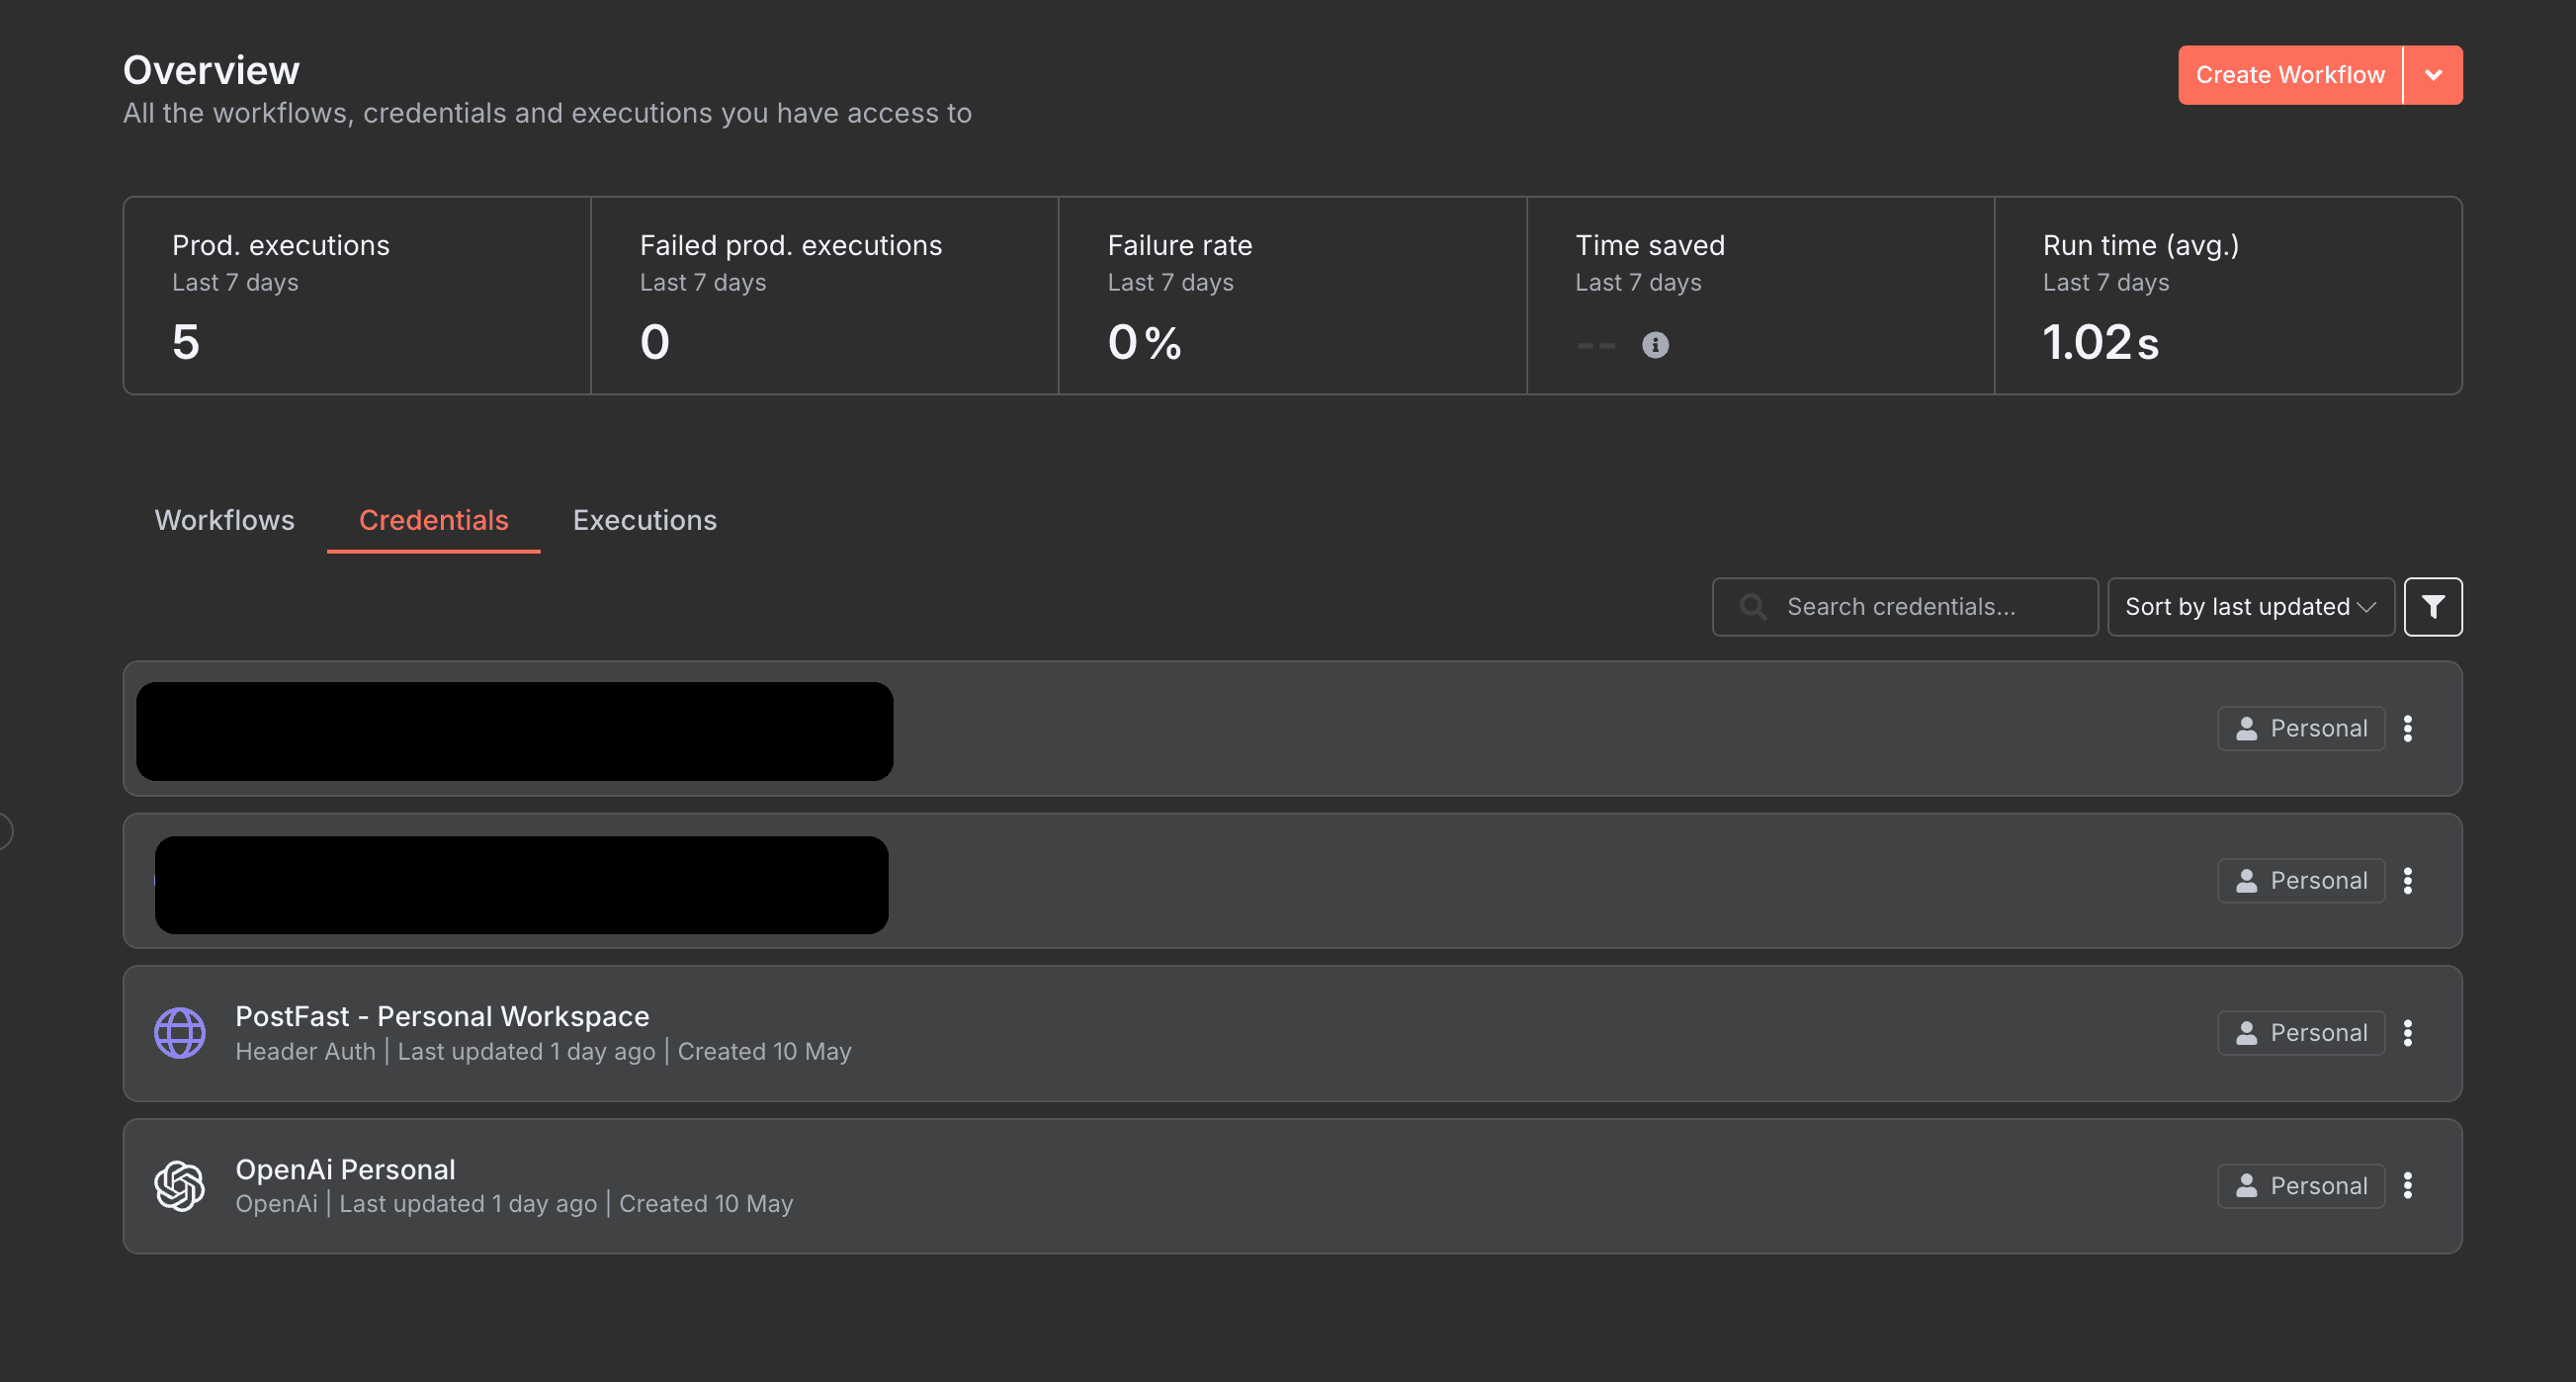
As you can see I've added already the two, for OpenAI it's simple.
- Go to https://platform.openai.com/settings/organization/api-keys and generate a key. I'd highly suggest you put a limit on the usage, so you don't get suprised with a large bill.
- Go to the credentials tab and at the top right next to "create workflow" choose the arrow and click create credentials
- Find OpenAI and enter your API key, and if you have an organization, provide it there too
For the PostFast API key, you need to have an account at the platform. Log in and go to workspace settings. There choose API tab, and generate API key. Don't forget to connect your accounts at the "accounts" tab, as you're able to schedule with accounts only connected to that workspace.
Back to our n8n instance.
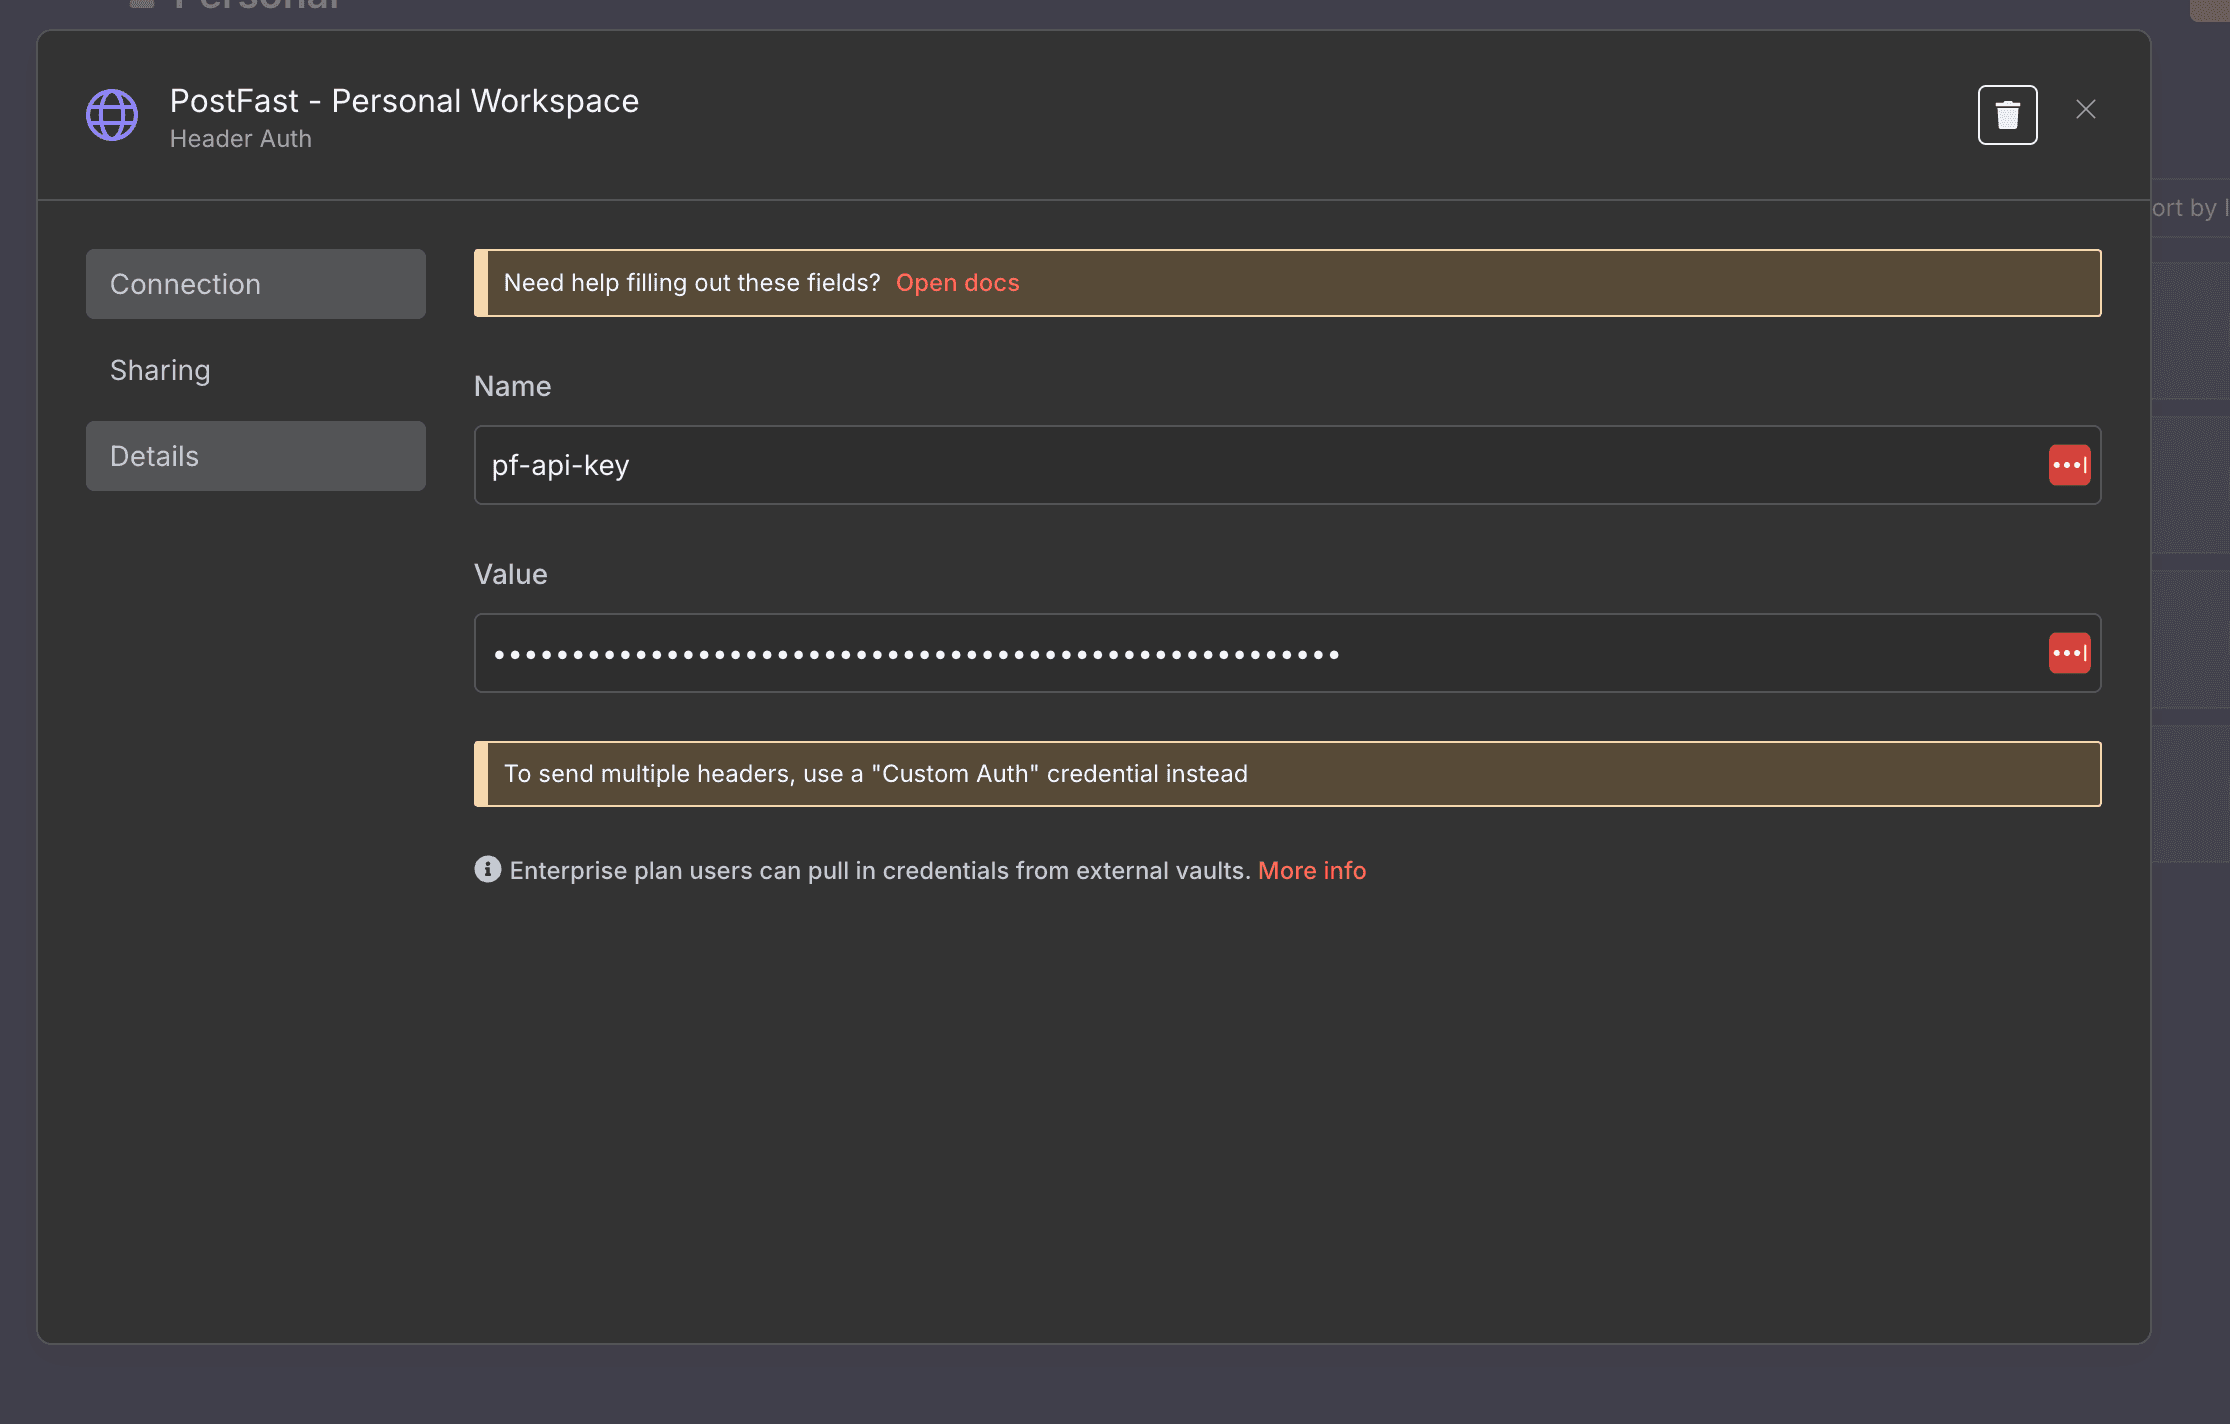
- Choose add new credential
- Select - Header auth, and continue
- Enter pf-api-key as name, and as value the API key. (see photo below)
I'd also suggest renaming the credential (as you can see mine is PostFast - Personal Workspace), so I can have multiple credentials/workspaces.
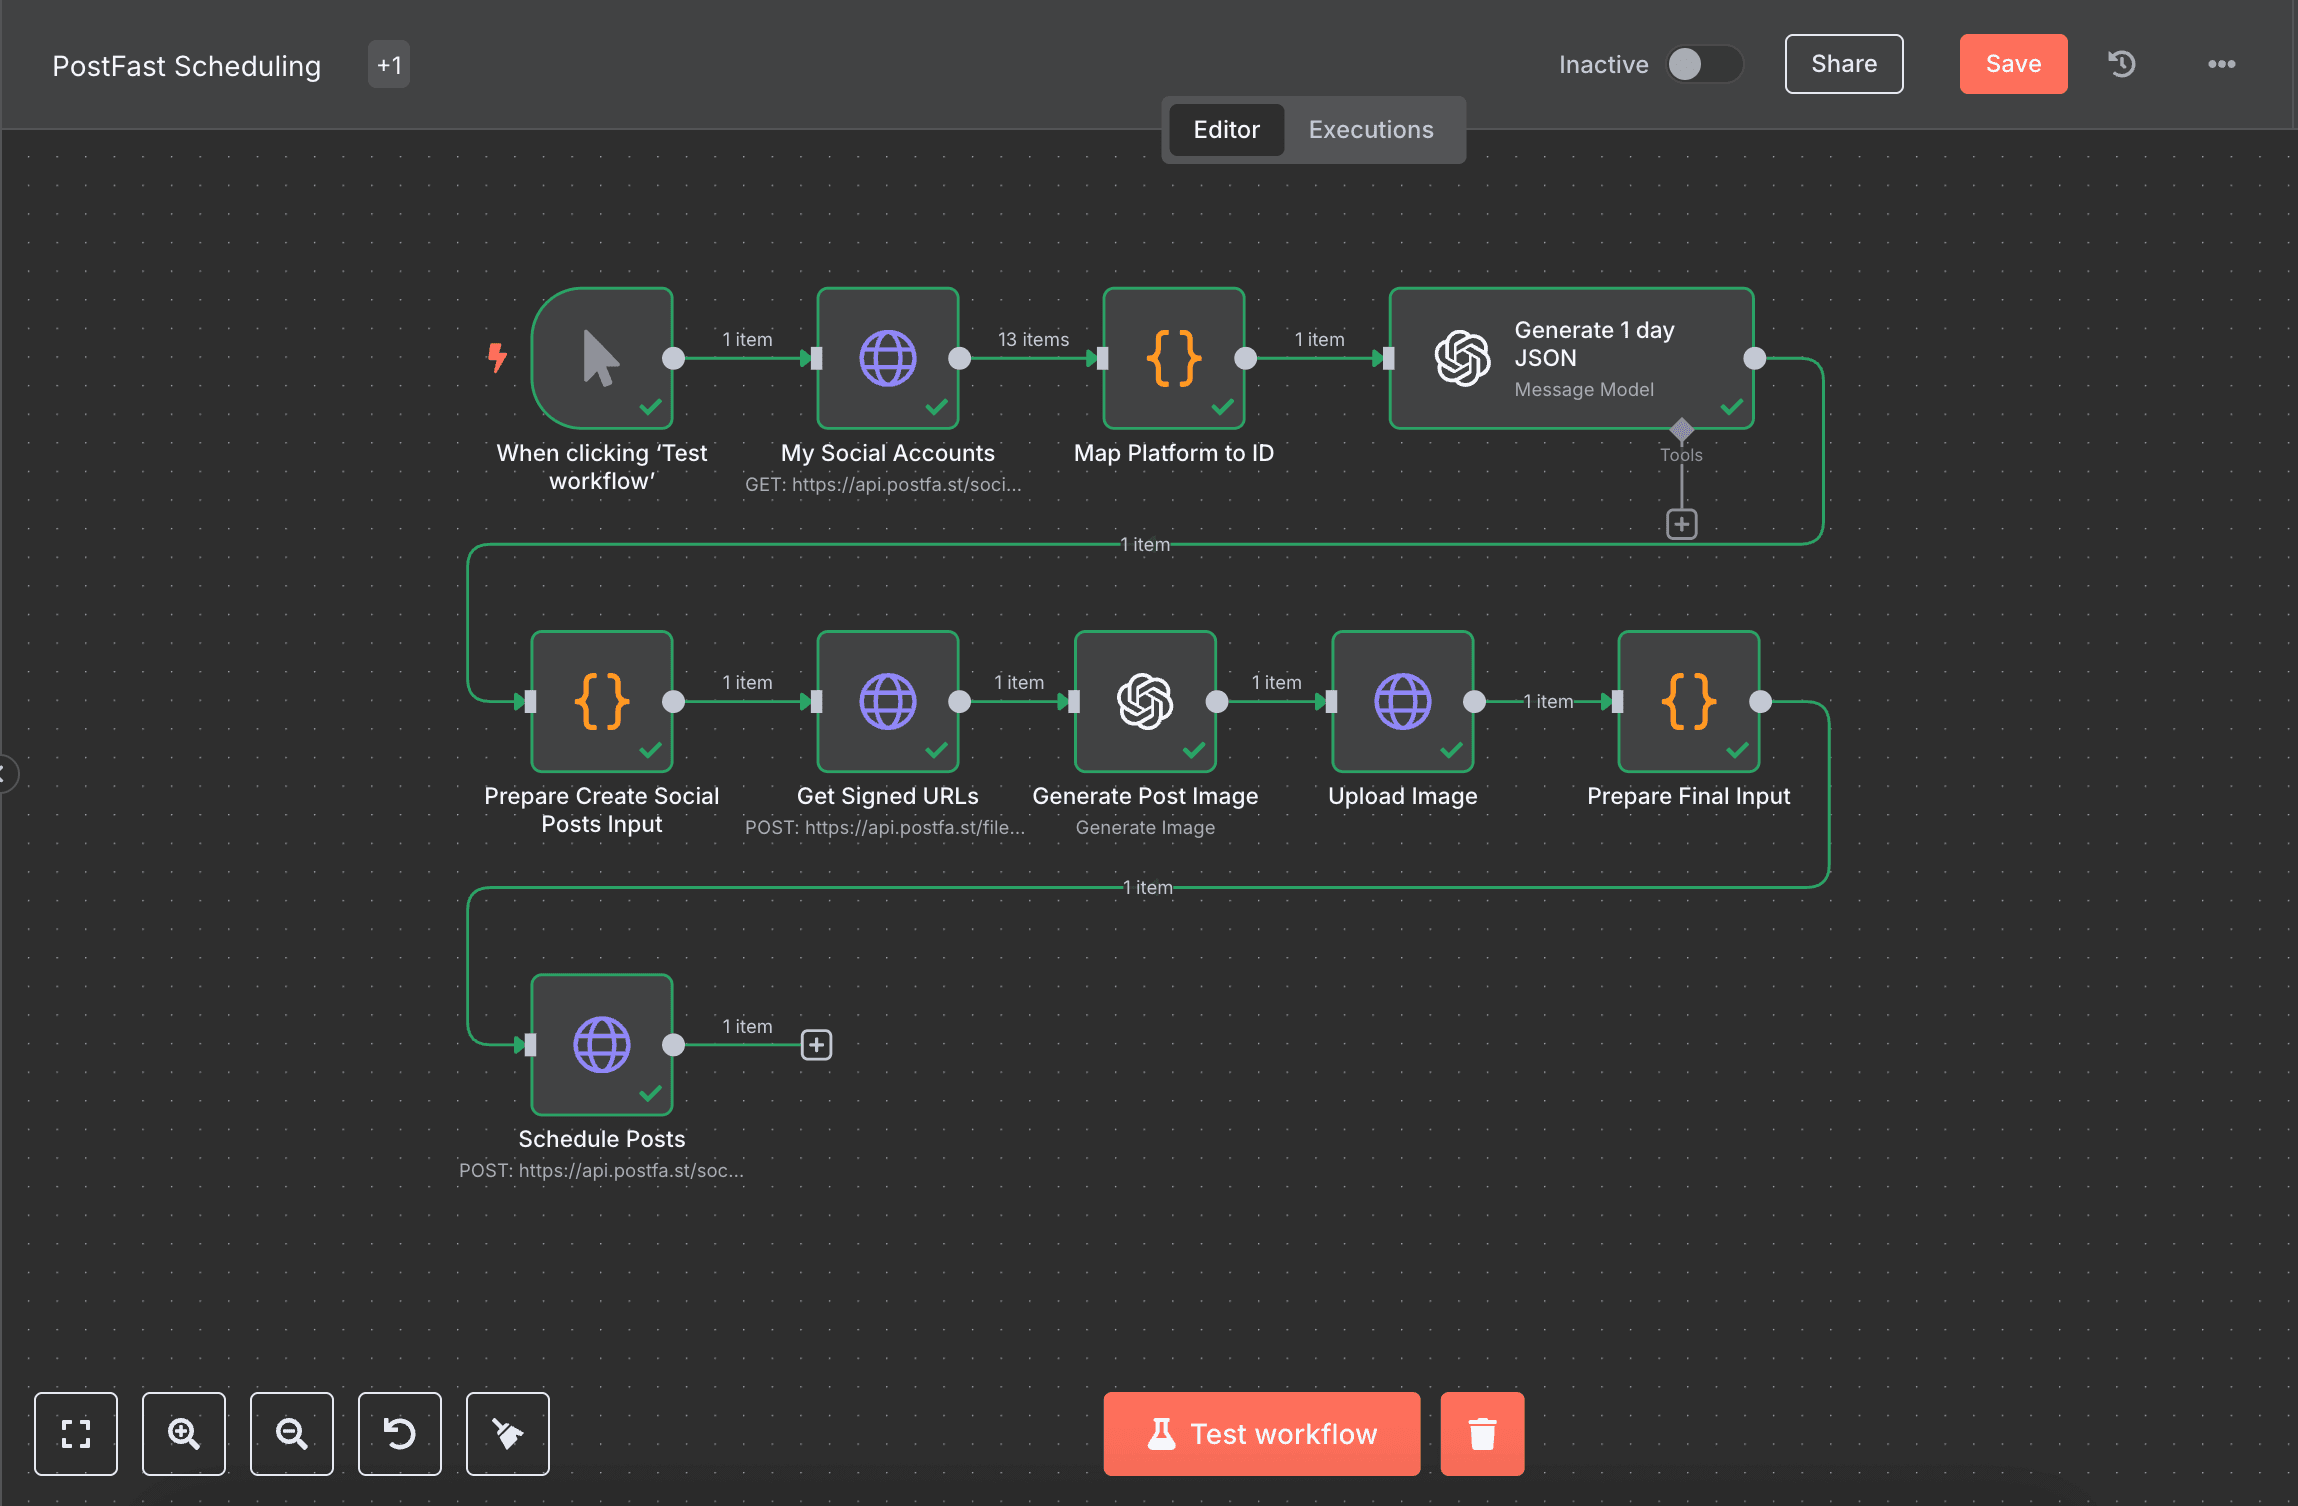
Workflow overview
In a simple overview, I'd say we have multiple steps. I'll list them below:
- Trigger workflow
- Get social accounts
- Map platforms to IDs
- Generate JSON content with OpenAI
- Prepare the Input for creation
- Get signed URLs for publishing media
- Generate Image with OpenAI with the data from previous steps
- Upload the image to the signed URL
- Finalize the Input
- Scheduled the posts with another HTTP block
You can change, modify or extend however you like, this is the simplest way to show the broadest functionalities you can achieve with this setup.
Create initial workflow blocks
We have a trigger workflow, but it is a manual one. The reason is that you can make it to be a cron job, a webhook or whatever you decide, for the sake of simplicity its like that.
The next step is to add an HTTP block that would get our social accounts for the workspace key. We add the URL and the authentication as Generic Credential Type, header auth with our PostFast - Personal Workspace credentials as on the photo.

Moving forward, we need to add a Code block that would have the responsibility to map those accounts to the correct format to use in further blocks.
You can use the code below, and I'll explain it:
const allowedIds = [
  // Add here media ids from previous step as "uuid"
  "136e6f4d-04cf-435e-8270-e7dfe33b8575"
];

const filteredMap = $input.all().filter((acc) => {
  return allowedIds.includes(acc.json.id)
});
const platformMap = filteredMap.map(acc => ({ [acc.json.platform]: acc.json.id}));

const socialMediaIds = filteredMap.map(acc => acc.json.id)

return {
  platformMap,
  socialMediaIds
};
We're filtering the accounts we want. The reason we have hardcoded IDs (could be taken from the previous step) is that we might have more accounts in the workspace, and we want to schedule only for some in this workflow.
If all your accounts are scheduled from this workflow, just use $input.all(), but I recommend not calling the API, and hardcoding the IDs as they won't change.
From here we're moving to the "AI" part.
OpenAI nodes to work
I don't want this article to be too long, so I'd try to reduce everything to the bare minimum.
Next steps:
- Add a new node
- Choose OpenAI
- Text Actions - Message a model
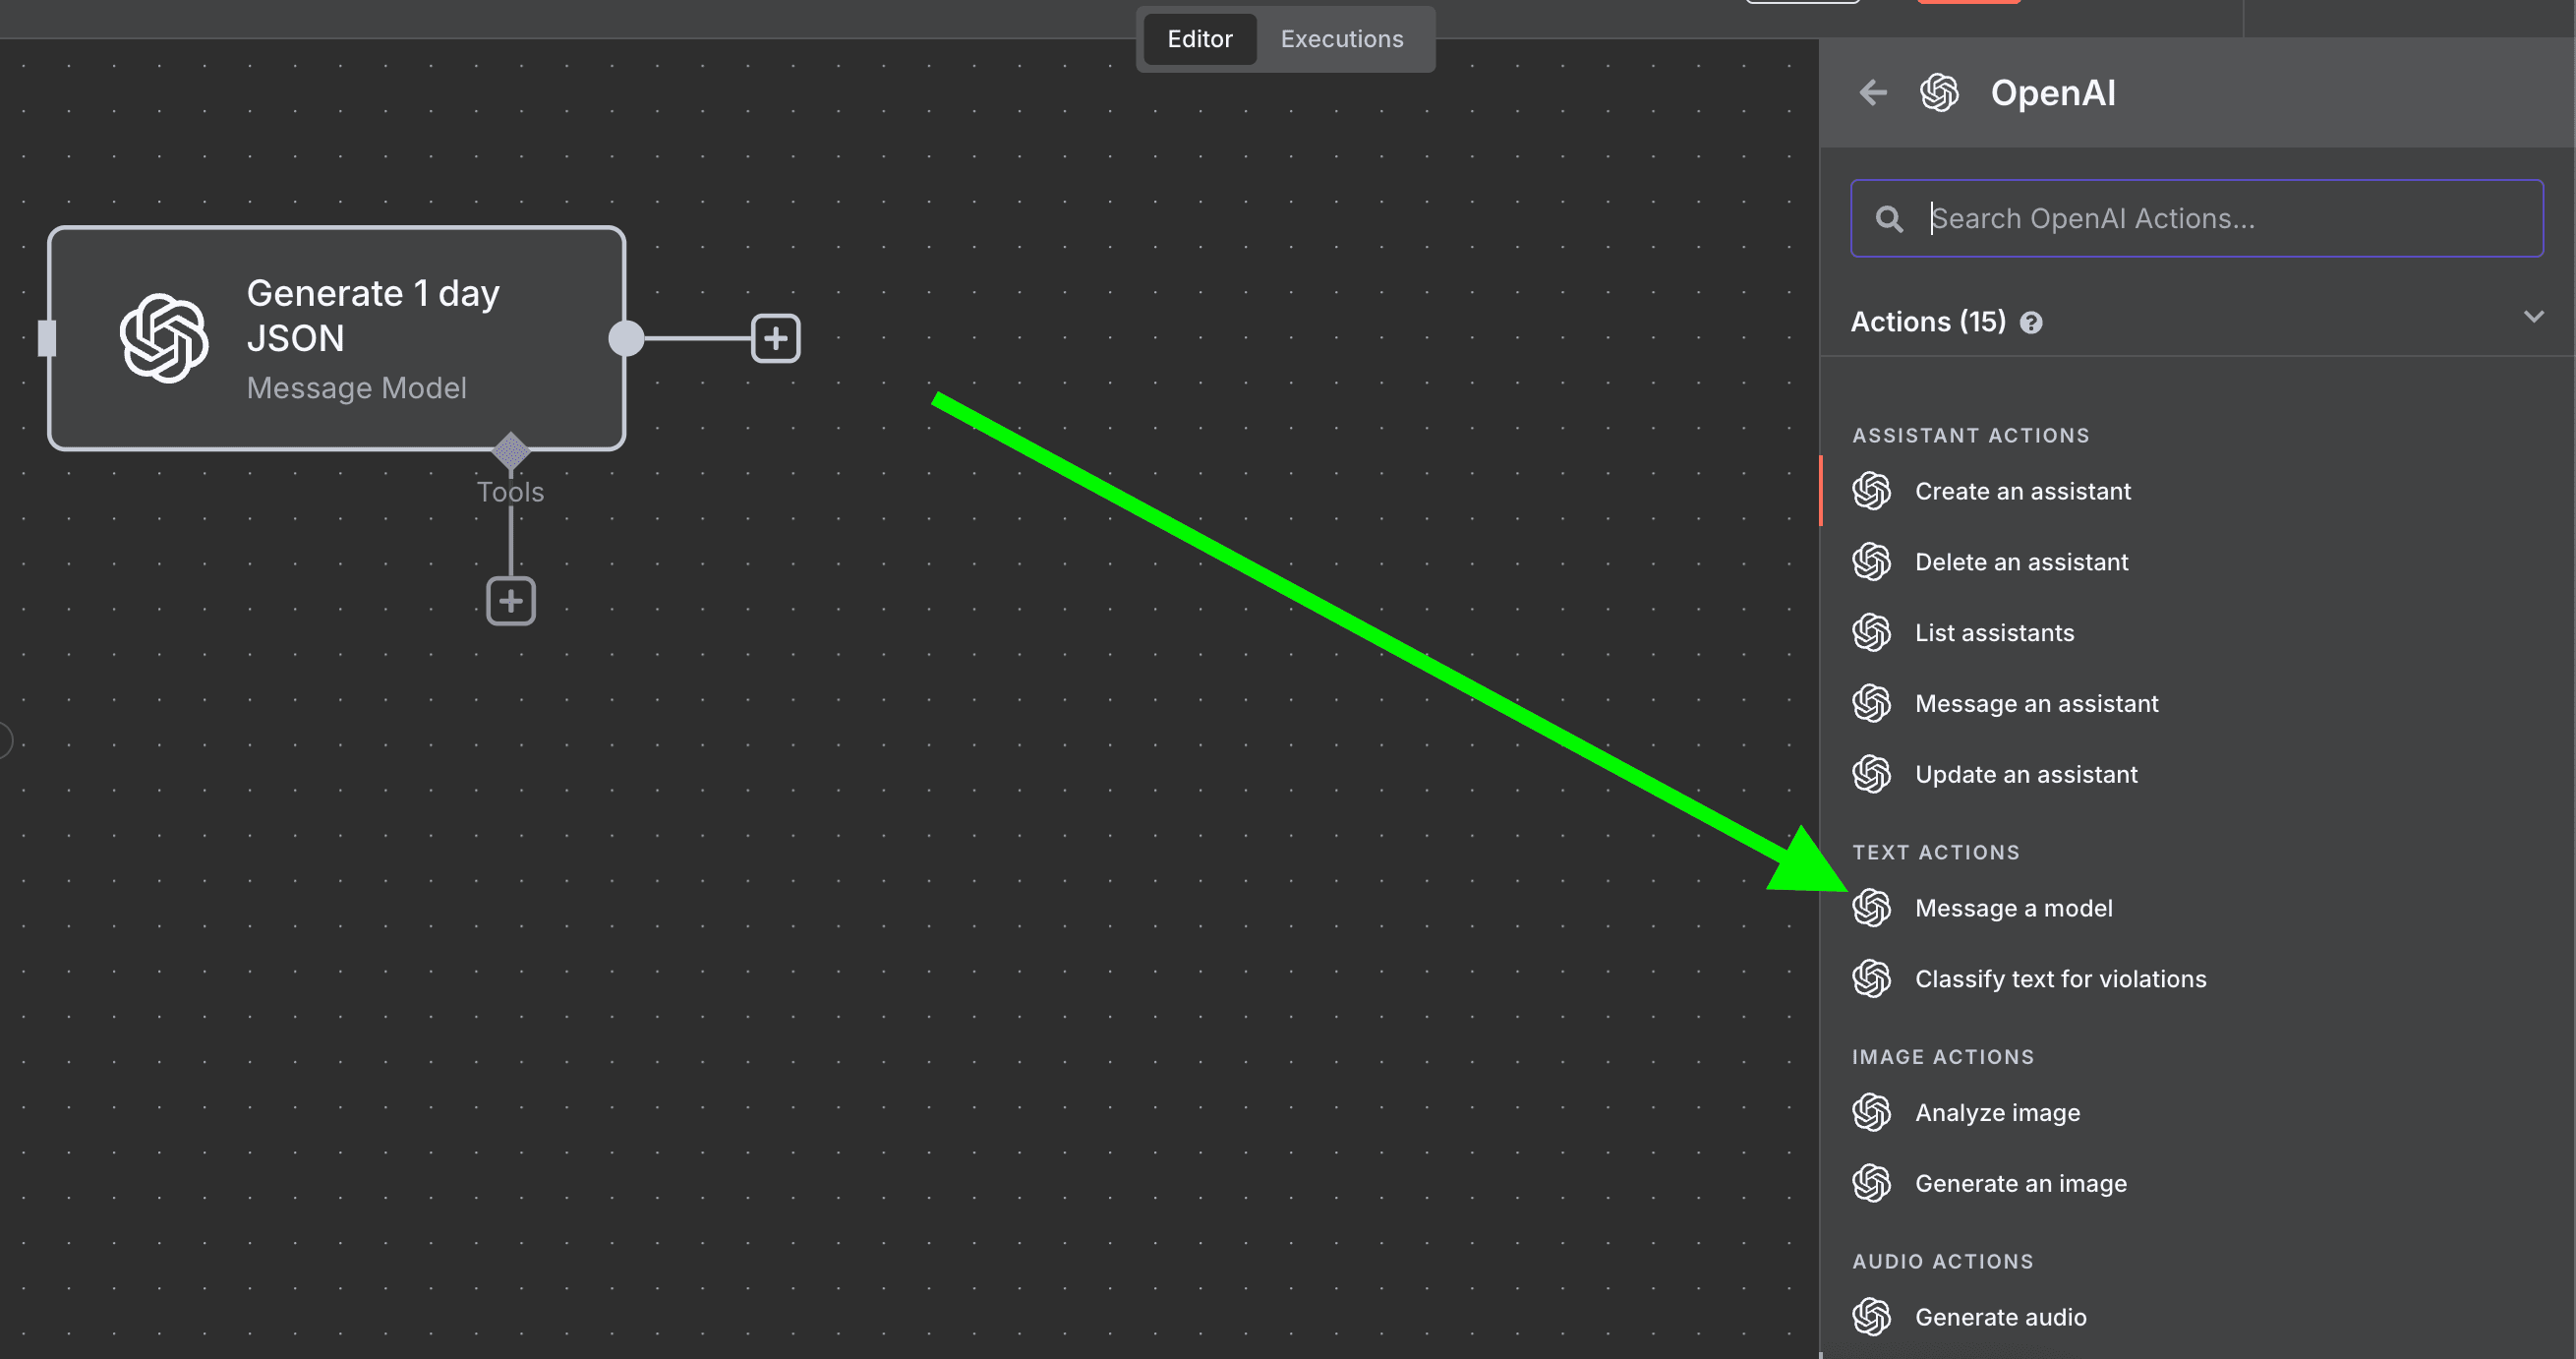
From here, we choose our model (4.1 mini in my case), and we add system/user prompts.
I'll give you an example of a system prompt:
You are an expert social-media content strategist. When given brand parameters and style guidelines, you will output a JSON object containing a 1-day social media plan. The JSON must be a single  object. Object must have these keys:

topic (string)

text_on_image (short string, what appears on the image in bold, no logos)

caption (short, punchy string for IG/TikTok, no hashtags, no “DM us” or “check bio”)

visual_direction (brief prompt for an AI image generator, describing a flat-vector/cartoon style illustration similar to the provided two-panel style, with optional bluish pastel backgrounds, thick outlines, clean composition)

Ensure the JSON is the only output (no extra text).
You should enrich it and tailor it to your use case (the topic, text_on_image, caption, visual_direction are important for the next nodes). For the user input, the same things apply, and here is the example:
Using these parameters:

Audience: small business owners, content creators, agencies, influencers

Voice & Style: mix fun, witty, motivational; emphasize time-saving; optional bluish pastel palettes

Product: PostFast—cross-posting to IG, TikTok, etc.; ease of use; carousel support; multi-platform scheduling; more affordable than competitors

Content Mix: tips, memes, behind-the-scenes, mini-tutorials, comparisons

Goal: brand awareness with subtle CTAs like “Try PostFast” integrated into imagery—no direct “check bio”/“DM us”

Hashtags: none

Captions: short and punchy

Generate a distinct topic, provide the JSON fields as specified. Make the visual directions hand-off-ready for an AI tool (e.g. “A flat style cartoon of a relaxed creator…”).
Ensure the illustration style matches the provided sample: flat vector, bold outlines, minimal text overlay, pastel or bluish backgrounds, simple scenes.
Output only valid JSON.
Tick both switches at the end for:
- Simplify Output
- Output content as JSON
I'd like to add here another code node, so I could map the response from OpenAI. In here you could make a date as a part of the initial trigger or modify it however you like. It's simplified to scheduled for the next day in the correct format, and we make the input as the PostFast API expects it. (we do enrich with image info which we'll remove later on)
const startDate = new Date();
const futureDays = 1;

function buildSchedule(startDate = new Date(), socialMediaIds = []) {
    const dt = new Date(startDate);
    dt.setUTCDate(dt.getUTCDate() + futureDays);
    const iso = dt.toISOString(); // YYYY-MM-DDTHH:mm:ss.sssZ
    const input = $input.first().json.message.content;

    const posts = socialMediaIds.map((id) => ({
      content: input.caption,
      scheduledAt: iso,
      socialMediaId: id,
    }));

    return {
      scheduledAt: iso,
      posts,
      imageInfo: {
        textOnImage: input.text_on_image,
        aiPrompt: input.visual_direction
      }
    };
}

const socialMediaIds = $('Map Platform to ID').first().json.socialMediaIds

// build and return a single schedule object
const schedule = buildSchedule(startDate, socialMediaIds);
return { schedule };
From here onward, we need to get the signed URLs so we could get our image uploaded.
Add another HTTP code block with a POST request type. Do note that the JSON at the bottom is important to be put like that, as OpenAI returns images as PNGs.
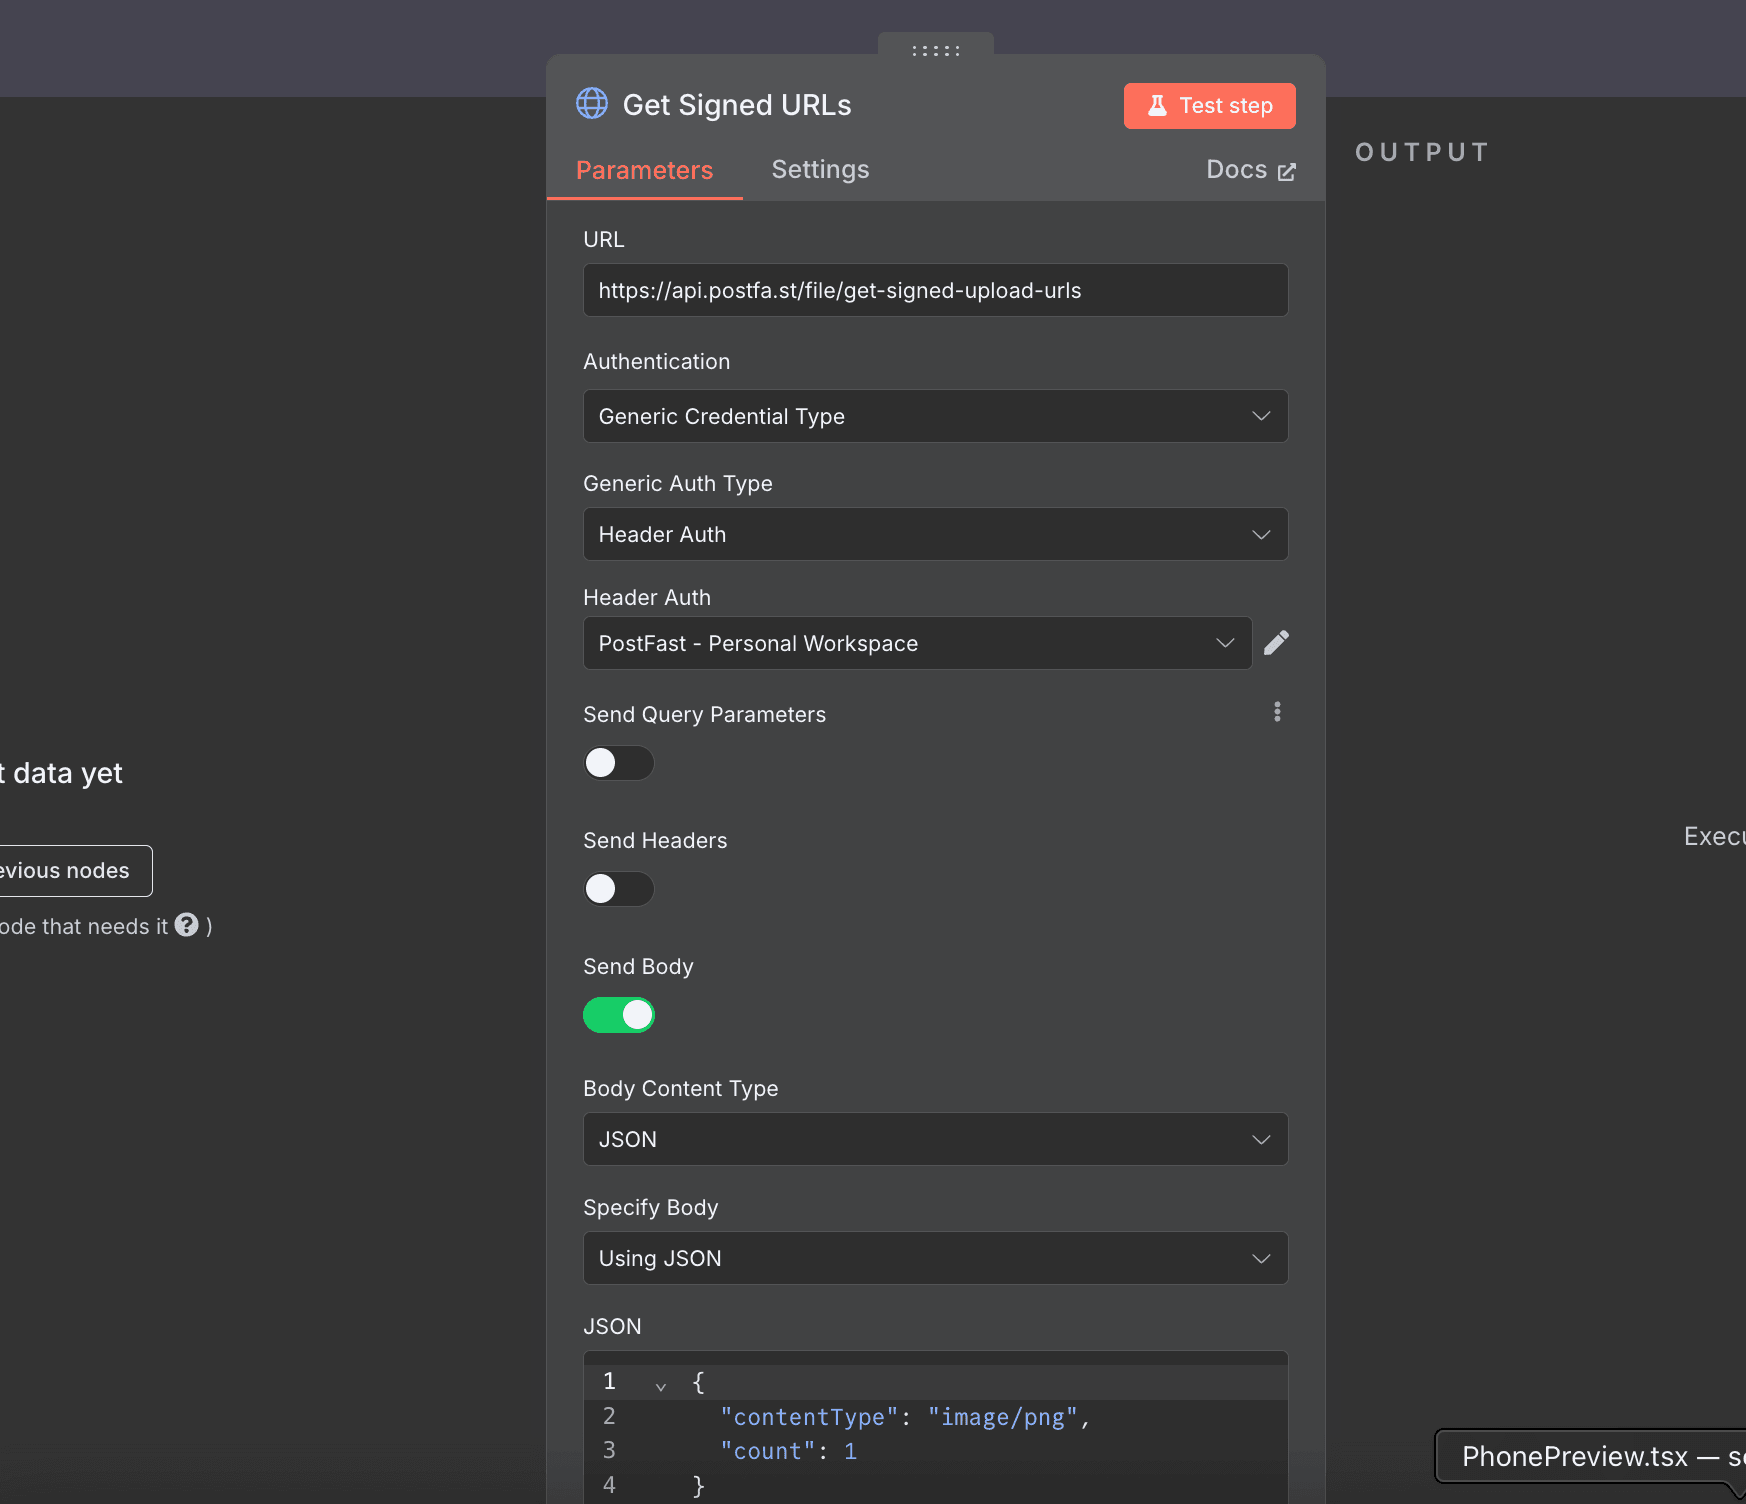
You'd need to connect this block to another OpenAI block of type - Image actions - Generate an Image. I'd choose GPT image 1 as the model, as it's pretty sick in terms of quality.
The prompt should be as follows, as we already have our message model prepare it for us.
Generate an image.

Text on Image: {{ $('Prepare Create Social Posts Input').item.json.schedule.imageInfo.textOnImage }}

Image Prompt: {{ $('Prepare Create Social Posts Input').item.json.schedule.imageInfo.aiPrompt }}
An important step is at the bottom of the node to add Put Output in Field - imageBinary, so we can reuse it.
Quick stop, if you like this article so far, I'd love to get your support with the "buy me a coffee" button on the bottom right of the page. Thanks!
You must've gotten the idea of how n8n workflows work by now. As for logic goes, we're adding another HTTP block to upload the image we generated.
This one is quite tricky. I'll add all the configs here:
Method of request: PUT
URL: {{ $('Get Signed URLs').item.json.signedUrl }}
Send headers: True (Using fields below)
- Name - Content-Type
- Value - {{ $('Generate Post Image').item.json.mimeType }}
Send Body: true
- Body Content Type: n8n Binary File
- Input Data Field Name: imageBinary (from previous node)
This is all you need for the upload. Do note that the expiry of the signed URL is 5 minutes. If you want, you can reorder the nodes to generate the image and only then get the signed URL.
As a pre-final step, I like to prepare my input, so that the final is simple. Add another code block.
const getFinalInput = () => {
  const previousPosts = $('Prepare Create Social Posts Input').first().json.schedule.posts;
  const imageKey = $('Get Signed URLs').first().json.key;
  const mediaItems = [
    {
      key: imageKey,
      type: 'IMAGE',
      sortOrder: 0,
      // You can add here for platform that support it.
      // coverTimestamp: 0
    }
  ]

  return {
    posts: previousPosts.map(p => ({...p, mediaItems})),
    controls: {}
  }
}

return getFinalInput()
Here we can modify/improve as this is the "structure" the PostFast API expects the body, you can read more in the docs.
We've gotten to the final step!
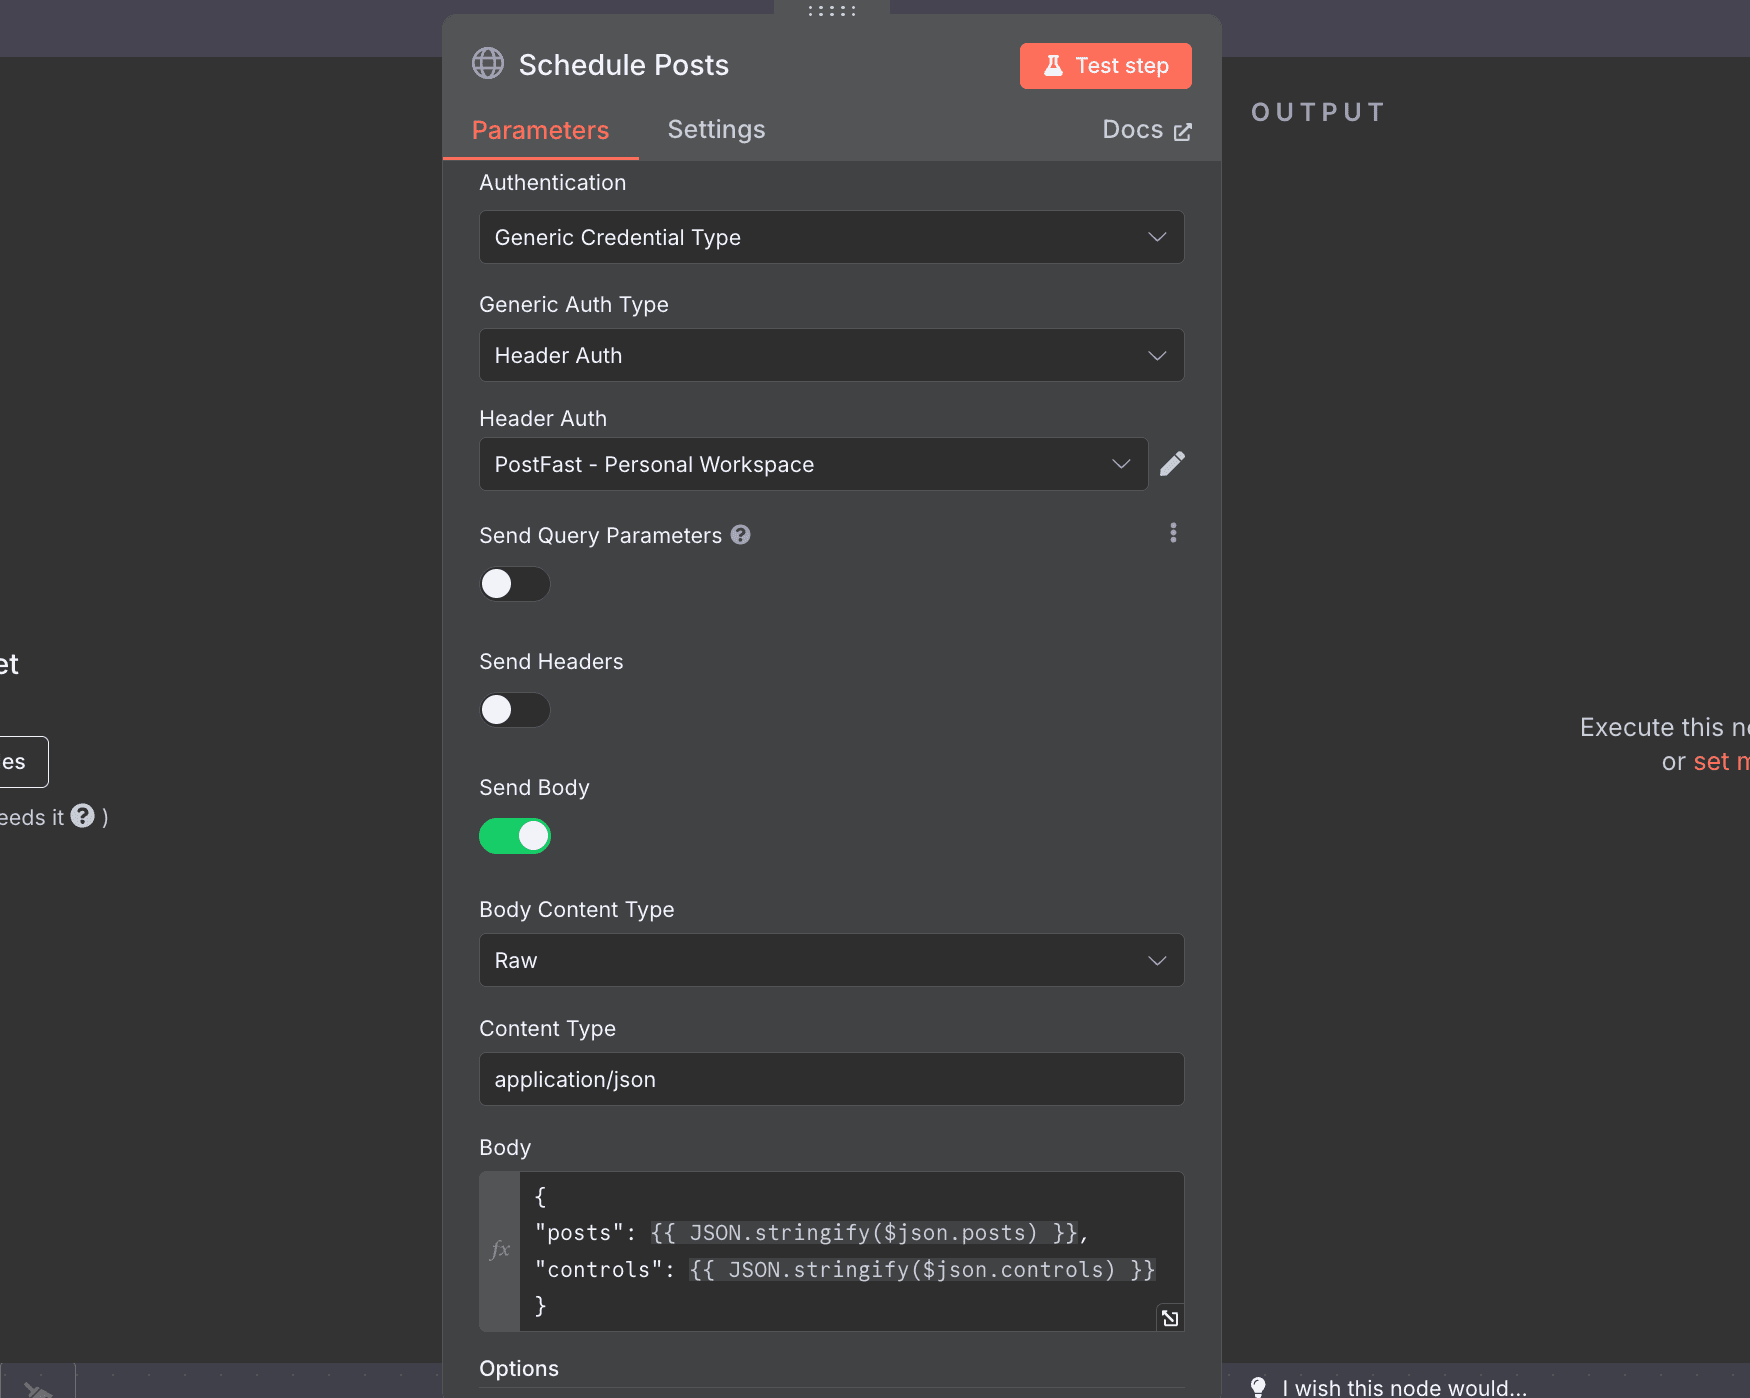
Add HTTP node, and name it Schedule Posts (or whatever you like).
Method: POST
URL: https://api.postfa.st/social-posts


Body:
{
"posts": {{ JSON.stringify($json.posts) }},
"controls": {{ JSON.stringify($json.controls) }}
}
This is it. We're ready to test our integration.
Final words and testing
Click on Test Workflow at the bottom, and if you've followed the steps, added all proper credentials, and changed the social media ids from the HTTP node for my-social-accounts, it should become green as grass. (photo below of successfull flow)
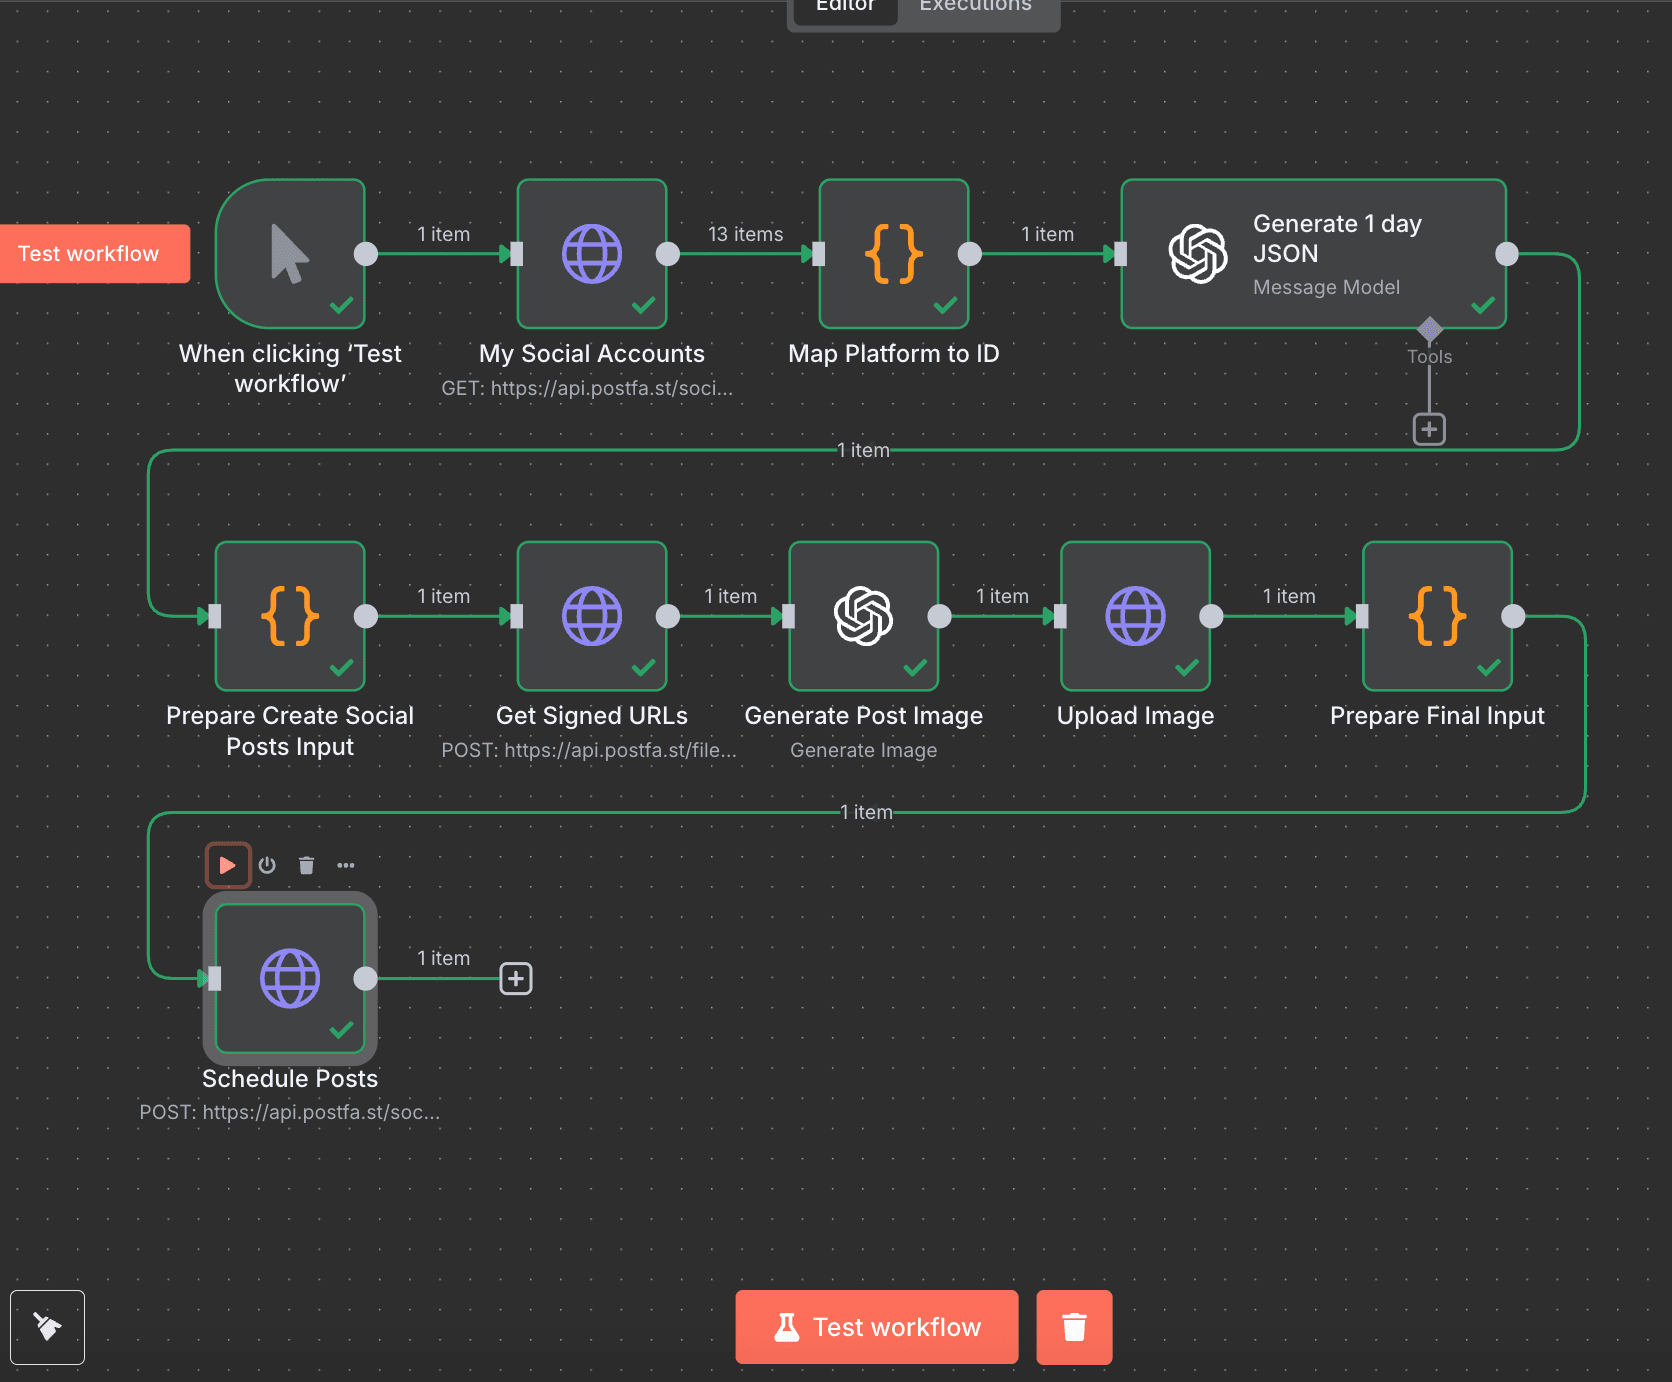
This is how simple it is to automate your social media content generation.
In general, if you just imported the n8n file, you could've done this for a minute or two.
My suggestions here for your integration would be:
- Improve and tailor to your needs both AI nodes prompts for system/user as its the most important part to get real views
- Hard-code social media IDs and disable my-social-accounts node
- Change trigger to cron job and make it run daily
- The first 10+ days preview all the automation does, and tweak whatever is needed in prompts
If you have any questions, reach out on Twitter/X or LinkedIn! If you liked the article, or it helped you, there is a "buy me a coffee" button on the bottom right of the page. I'd love the support!
Related articles
Is AI (Mythos) finally going to destroy Software as we know it?!
AI is reaching its final form, bringing both serious security risks and massive opportunities. Here's how it will reshape SaaS, software engineering, and the tech ecosystem.

How to add Discord alarms to self-hosted Netdata (Coolify)
Having monitoring without alerts is like having a laptop without internet. It's good to have, but mainly useless.

How to Create a Contact Form with Discord and NextJS (FREE)
How to avoid setting up STMP providers and complex email validations and create a discord channel to send contact forms information.
Save Time Launching Projects on iTerm2 - Python Script
Running different terminals and navigating to folders one by one? Automate it with one script using iTerm2.

How to Create GitHub Actions - Build & Test your Application on Pull Requests
Create GitHub actions that automate the process of building and testing your application on every pull request to avoid further issues.
ChatGPT Integration with NodeJS/NextJS - Step by Step Tutorial
Build a ChatGPT integration for communication as a Full-stack application with NextJS. Scale your project after the tutorial.
My Newsletter
Subscribe to my newsletter and get the latest articles and updates in your inbox!