How to Add Internationalization to NextJS app router (next-intl)
Adding internationalization is easier than it looks. Good apps benefit from it even if there is no need to have it. Improves code readability!
If you're building an app it's most likely to need internationalization. I'll keep this article short and simple. Our routes will always be suffixed, as in the examples:
- http://route.com/en
- http://route.com/bg
We'll enrich a NextJS project built with an app router and add next-intl to use in server and client components. The final code will be provided at the bottom of the article. The starter code is taken from the article for NextJS Starter with App Router. It's not needed to use it, you can use any project.
In my opinion, always start with localization even if the app is in one language. It's much easier to just create a new file and translate everything in the future, instead of finding all magic strings.
Preparing our project
A few steps are needed here:
- Installing of dependencies
- Changing our folder structure
- Boilerplate messages files
- Modifying the config file
Run the command to install the next-intl package.
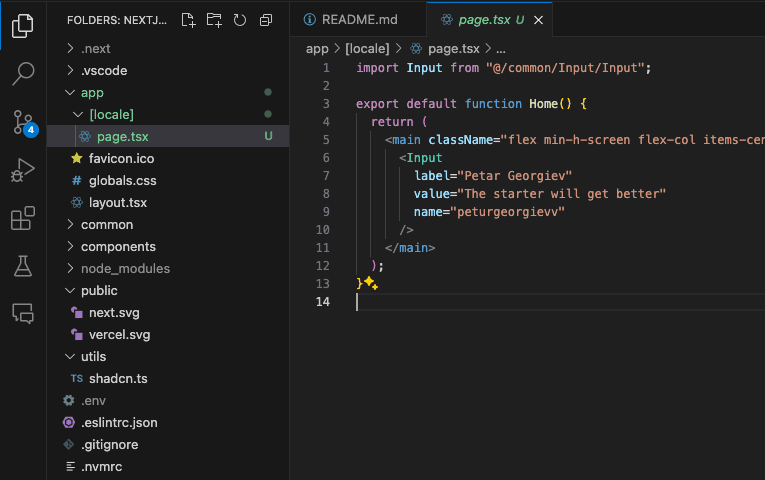
npm install next-intlNext up is to create a folder inside /app named [locale]. Our pages will be nested inside it, so this means moving page.tsx inside as shown on the photo below.
To modify our configuration, first, we'll create a file on top-level (not necessary there), named i18n.ts. The contents would be as follows.
import { notFound } from "next/navigation";
import { getRequestConfig } from "next-intl/server";

export const locales = ["en", "bg"];

export default getRequestConfig(async ({ locale }) => {
  if (!locales.includes(locale)) {
    notFound();
  }

  return {
    messages: (await import(`./messages/${locale}.json`)).default,
  };
});
As you can see there are imports from the messages folder, which we still don't have. These would be our translations for different locales.
Create a top-level folder named messages and add two files with your corresponding locales, in my case - <bg|en>.json files. We could nest the keys on page names to make it easier to find the translations as in the example. In each file, copy and paste the following code.
This one is for English translation.
{
  "home": {
    "title": "Home"
  }
}
This one is for Bulgarian translation, or whatever is your language of preference.
{
  "home": {
    "title": "Начало"
  }
}
Now we're ready to change the next configuration file. Navigate to next.config.mjs and paste the following content to have our i18n configuration applied.
import createNextIntlPlugin from 'next-intl/plugin';

const withNextIntl = createNextIntlPlugin('./i18n.ts');

/** @type {import('next').NextConfig} */
const nextConfig = {
  output: 'standalone'
};

export default withNextIntl(nextConfig);
From here we're ready to try our server and client components, which is the next step.
Translating our app (server-side)
We'll explain two possible ways for translations. The first one is not a server-side one.
- useTranslations - Standard hook which you have probably already used. It can be used only in client components.
- getTranslations - Function from next-intl/server that is to be used only in server components.
First, we'll show the getTranslations function on our home page. Go to /app/[locale]/page.tsx and use the code below.
- It renders on the server
- Gets translations from our locale files
- Shows a title at the top of the page translated
import Input from "@/common/Input/Input";
import { getTranslations } from "next-intl/server";

export default async function Home() {
  const t = await getTranslations("home");

  return (
    <main className="flex min-h-screen flex-col items-center justify-start gap-8 p-24">
      <h1 className="mb-4 text-xl font-bold text-center">{t("title")}</h1>
      <Input
        label="Petar Georgiev"
        value="The starter will get better"
        name="peturgeorgievv"
      />
    </main>
  );
}
Note that we use Tailwind CSS as in the starter, you can just put simple CSS or none at all, the point here is to show how the internationalization works.
If you've been following till now, an error should be shown stating that we don't have a middleware and a locale is not found.
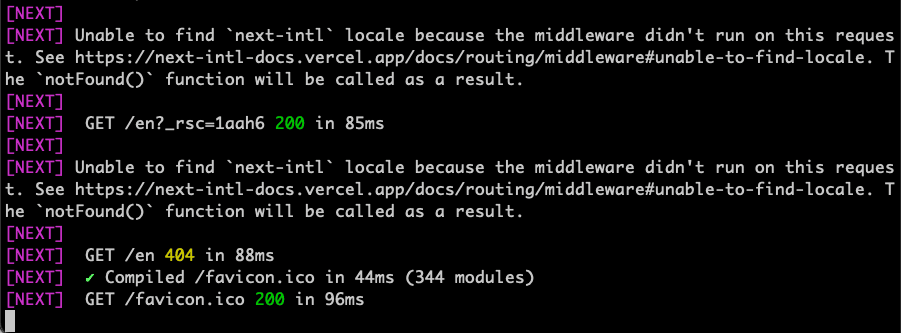
Obviously, it's time to create our middleware. There are different ways to go for it, depending on your preference. In NextJS documentation you could find a more general way, and in next-intl you can find a wrapper function for the middleware.
I've decided on a "mix" of both worlds, as I'd prefer to have the ability to extend my middleware with custom logic instead of just passing createMiddleware from next-intl.
Create a file root level named middleware.ts and use this code.
import { locales } from "@/i18n";
import createMiddleware from "next-intl/middleware";
import { NextRequest } from "next/server";

const LOCALE_KEY = "x-locale";

export default async function middleware(request: NextRequest) {
  const defaultLocale = request.headers.get(LOCALE_KEY) || locales[0];

  const handleI18nRouting = createMiddleware({
    locales,
    localePrefix: "always",
    defaultLocale: locales[0],
    localeDetection: false,
  });

  const response = handleI18nRouting(request);
  response.headers.set(LOCALE_KEY, defaultLocale);

  return response;
}

export const config = {
  matcher: ["/", "/((?!_next|api|icons|images|robots.txt).*)"],
};- We have a NextJS middleware that could be extended with custom logic
- A locale key in our headers and default to our first locale if not present. (I'd suggest here to prefix/suffix it with your app name or something)
- Created from the request - next-intl middleware to handle internationalization.
- Custom response with our current locale set.
This could be further extended for any need, with libraries like Negotiator that might help you detect user language preferences, or with custom logic for your needs.
Now if you go to http://localhost:3051 you'll be redirected to /en and the simple form with the title should be present. Simply changing the URL to /bg would show you another title.
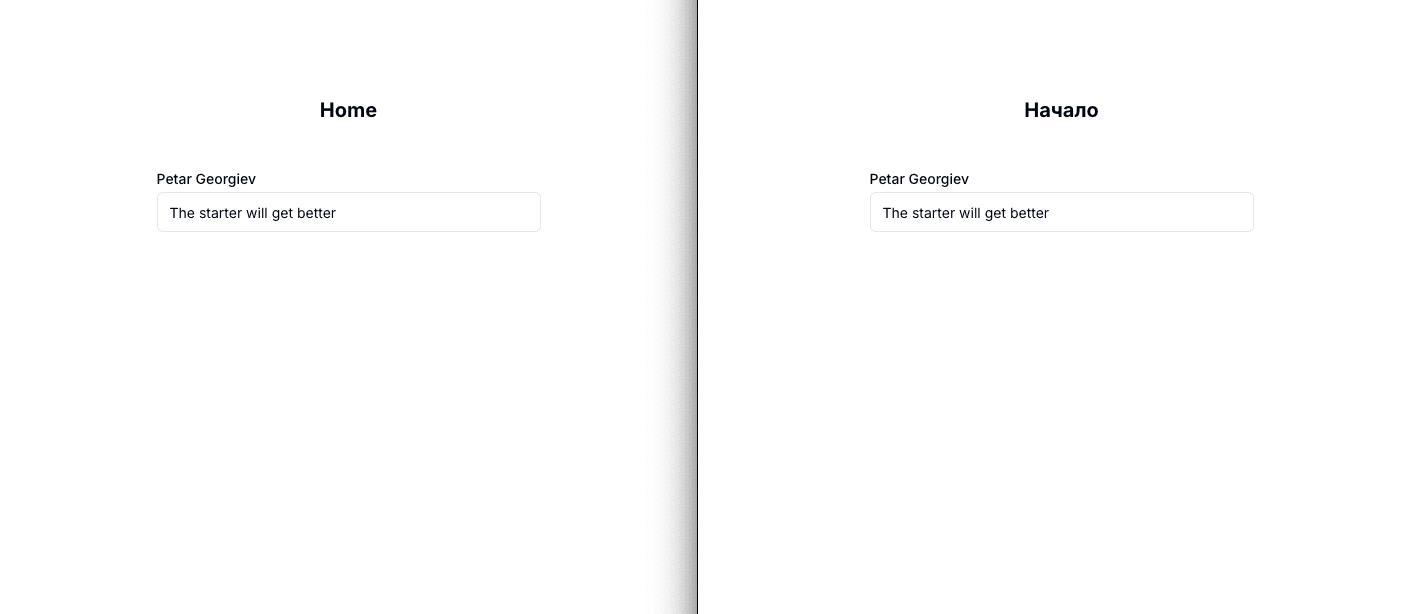
We'd normally do a language switcher, but this would be another article where we implement our header.
Just a small stop. If you like my articles a subscribe to my newsletter is highly appreciated! It's in the footer below along with my social media accounts!
Translating our app (client-side)
Time for the client part of the translations. What we'll do - A boilerplate of a component named LoginForm, with no functionality and no submitting, as we're only showing translations here. It's going to allow us to extend it in the future.
Create a folder and a file in the path /common/LoginForm/LoginForm.tsx and paste our code.
"use client";

import { useTranslations } from "next-intl";

const LoginForm = () => {
  const t = useTranslations("home");

  return (
    <form>
      <div className="mb-4 font-semibold">{t("title")}</div>
    </form>
  );
};

export default LoginForm;
We'll need to extend our layout with the next-intl client provider so we can use the hook. The /app/layout.tsx looks as shown.
import type { Metadata } from "next";
import { Inter } from "next/font/google";
import "./globals.css";
import { cn } from "../utils/shadcn";
import { getMessages } from "next-intl/server";
import { NextIntlClientProvider } from "next-intl";

const fontSans = Inter({
  subsets: ["latin"],
  variable: "--font-sans",
});

export const metadata: Metadata = {
  title: "Create Next App",
  description: "Generated by create next app",
};

export default async function RootLayout({
  children,
}: Readonly<{
  children: React.ReactNode;
}>) {
  const messages = await getMessages();

  return (
    <html lang="en">
      <body
        className={cn(
          "min-h-screen bg-background font-sans antialiased",
          fontSans.variable
        )}
      >
        <NextIntlClientProvider messages={messages}>
          {children}
        </NextIntlClientProvider>
      </body>
    </html>
  );
}
What we've added is the NextIntlClientProvider and messages from next-intl server. To verify that all is OK, navigate back to page.tsx and add the login form component.
import Input from "@/common/Input/Input";
import LoginForm from "@/common/LoginForm/LoginForm";
import { getTranslations } from "next-intl/server";

export default async function Home() {
  const t = await getTranslations("home");

  return (
    <main className="flex min-h-screen flex-col items-center justify-start gap-8 p-24">
      <h1 className="mb-4 text-xl font-bold text-center">{t("title")}</h1>
      <Input
        label="Petar Georgiev"
        value="The starter will get better"
        name="peturgeorgievv"
      />
      <LoginForm />
    </main>
  );
}
With this, our implementation should be complete.
Adding internationalization is not as hard as someone might've thought. It's a simple process that you do once and forget in the future. From now on you add translations in the messages folder and this is all that is needed. The final code from this article is located at the branch next-intl-init.
If you have any questions, hit me up on Twitter/X or LinkedIn. At both places a follow is highly appreciated!
My newsletter will get you notified about any new articles coming out. You can subscribe below!
Related articles

How to improve your SaaS SEO & LLM's searches with NextJS (FAQs)
NextJS FAQs SEO boost. Increase your conversions with practial examples on improvements.
How to Create a Contact Form with Discord and NextJS (FREE)
How to avoid setting up STMP providers and complex email validations and create a discord channel to send contact forms information.

Create Production Dockerfile for NextJS - Deploy Everywhere
Dockerfiles aren't hard to do. You do it once per framerwork like NextJS and use everywhere!
NextJS Starter with App Router - TailwindCSS + ShadcnUI (partially)
Craft an extendable starter with NextJS App router for use in your production apps. Use Tailwind and Shadcn for styling.
Complex Form with Zod, NextJS and TypeScript - Discriminated Union
Building big forms that have proper validation is not an easy task. Explore how to build complex form validations with Zod and its discriminated unions.
My Newsletter
Subscribe to my newsletter and get the latest articles and updates in your inbox!