Create REDIS Service with NestJS - Use in Every Project
Implementing REDIS in a NestJS service is essential for projects that plan to scale and care about performance. Another tool in your path to production.
To create performant applications at some point we're going to get to implementing some kind of caching. In our case, it would be REDIS.
In this article, we will:
- Explain why we need REDIS
- Create a NestJS Redis module that would encapsulate it
- Add REDIS in our docker-compose file, to avoid the need for local installation
- Show an example of how to use it across your application
You need a basic NestJS understanding and an already set-up project. If you don't have any of those, you can go through the starter article here.
Do you need REDIS?
The short answer is - It depends.
The long answer. If an application starts to grow in terms of database resources or user base, it might benefit or need caching. It's important to distinguish between the "need" for caching and the "want" to have it. Don't add another layer of complexity If there is no real reason, similar to the ones below:
- Too frequent access to the database results in expensive DB hosting bills
- The general performance of the application is reduced due to complex DB queries that could be cached
- Infrequently changed information being called from the DB all the time
There are many more valid reasons, but these are just common ones. To better understand why we need it, here is an example below.
Let's assume you have users that have review ratings. You need the average sum of each user's ratings. The rating itself doesn't change frequently, but to be correct, we need to save it in the database as a computed field or calculate it dynamically on each request. There are a couple of possibilities for how to do it, but I'd listen for events that add or remove ratings and make a DB request to save the computed field in the REDIS cache with a key something like userId:rating:<value>. If you don't have an event system set up already (this will be covered in future articles), you can make the calculation request after the rating is changed in the service or command, or when it's requested.
Assuming you use GraphQL (it could be applied elsewhere too), in your ResolveField for ratings you first need to check if there is a cache record with the UserID rating and return it, otherwise to make a request for calculating it and save it in the cache for further requests.
Create our REDIS Module
First, we need to install REDIS dependencies. Run the below in the terminal of your NestJS project.
npm i --save ioredisThe explanations about REDIS integration is basic in the NestJS documentation, you can still check it out here.
Moving forward to the code implementation. We're going to create 1 directory and 2 files inside with paths as shown below:
- src/redis/redis.constants.ts
- src/redis/redis.module.ts
Navigate to the first and simpler one. In the constants, we'll have one for the client and one for the keys. For the keys, we'll continue with the example of user ratings. You can extend the code with a function building your REDIS key by passing an ID or any string. I just like to define all my constants, for easier change if needed.
export const REDIS_CLIENT = 'REDIS_CLIENT';

export const REDIS_KEYS = {
  userRating: 'user:rating:',
};

export const REDIS_MAX_RETRY_DURATION = 5 * 60 * 1000; // 5 minutes is enough for the redis server to restart
Now it's time to add our Redis module. I'll show you how it's possibly done for the simplest cases first.
import { Module } from '@nestjs/common';
import Redis from 'ioredis';
import { REDIS_CLIENT } from './redis.constants';

@Module({
  providers: [
    {
      provide: REDIS_CLIENT,
      useFactory: async () => {
        return new Redis({
          host: process.env.REDIS_HOST,
          port: +process.env.REDIS_PORT || 6379,
          showFriendlyErrorStack: true,
        });
      },
    },
  ],
  exports: [REDIS_CLIENT],
})
export class RedisModule {}
The above one is easy to understand and more than enough for your integration. However, working is not enough for developers who want to build well-performing applications. We want to ensure that it's production grade. This is why we're adding the possibility for a password, lazy connect, a retry strategy (a function that will try exponentially to connect to it), logging, and last but not least error handling.
You can use the snippet below for almost any application.
import { Module } from '@nestjs/common';
import Redis, { RedisOptions } from 'ioredis';
import { REDIS_CLIENT, REDIS_MAX_RETRY_DURATION } from './redis.constants';

type RedisRetryStrategyType = {
  delay: number | null;
  retryDuration: number;
};

export const redisRetryStrategy = (
  times: number,
  totalRetryDuration: number,
): RedisRetryStrategyType => {
  // Exponential backoff, cap at 30 seconds
  const delay = Math.min(1000 * 2 ** times, 30000);
  const currentRetryDuration = totalRetryDuration + delay;

  if (currentRetryDuration >= REDIS_MAX_RETRY_DURATION) {
    console.error(
      'REDIS: Stopping reconnection attempts. Max retry duration reached.',
    );
    return {
      delay: null,
      retryDuration: currentRetryDuration,
    };
  }

  console.log(
    `REDIS: connection retry, attempt ${times}, waiting for ${delay}ms`,
  );
  return {
    delay,
    retryDuration: currentRetryDuration,
  };
};

export const redisOptions = (): RedisOptions => {
  let totalRetryDuration = 0;

  return {
    host: process.env.REDIS_HOST,
    port: +process.env.REDIS_PORT || 6379,
    password: process.env.REDIS_PASSWORD,
    showFriendlyErrorStack: true,
    lazyConnect: true,
    commandTimeout: 1000,
    retryStrategy: (times) => {
      const { delay, retryDuration } = redisRetryStrategy(
        times,
        totalRetryDuration,
      );
      totalRetryDuration = retryDuration;
      return delay;
    },
  };
};

@Module({
  imports: [],
  providers: [
    {
      provide: REDIS_CLIENT,
      useFactory: async () => {
        const client = new Redis(redisOptions());
        // Handling when redis server is down and the application starts
        client.on('error', function (e) {
          console.error(`REDIS: Error connecting: "${e}"`);
        });
        try {
          await client?.connect?.();
        } catch (error) {
          console.error(`REDIS: Failed to connect: ${error}`);
        }
        return client;
      },
    },
  ],
  exports: [REDIS_CLIENT],
})
export class RedisModule {}
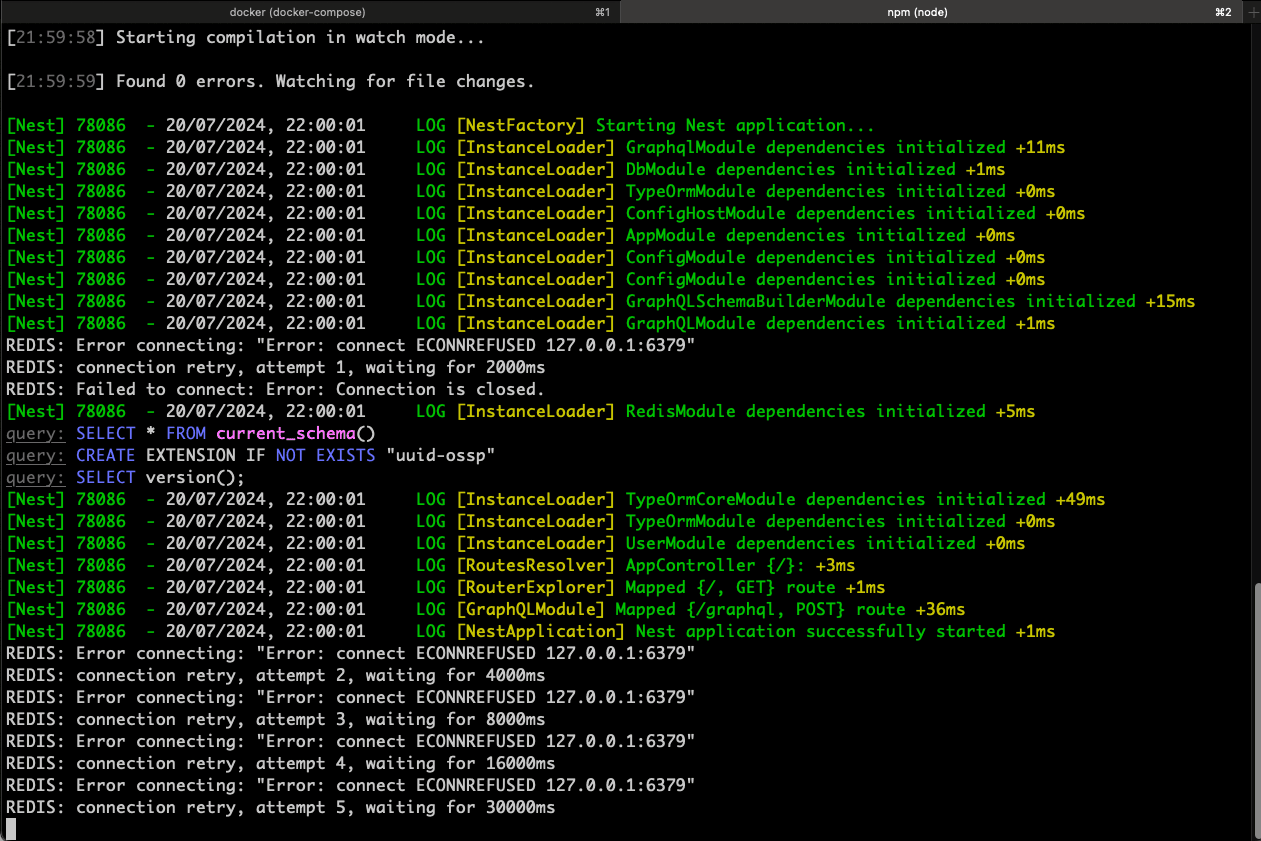
As with any other module, don't forget to import it into our App Module. You can now start your application and an error similar to the one in the photo will be present. It's because we haven't added Redis to our docker-compose file. Time to do that in the next section.
Redis in docker-compose
It's important to have the same environment on different machines, as it'll help us with the deployment and with issues in local development. We're adding Redis to our compose file, as we did with Postgres in the starter article. I'll provide the whole compose file.
version: '3.8'
services:
  postgres:
    image: postgres:15
    container_name: peturgeorgievv-nestjs-starter-db
    ports:
      - '5432:5432'
    environment:
      POSTGRES_USER: postgres
      POSTGRES_PASSWORD: root
    volumes:
      - my_postgres_data:/var/lib/postgresql/data # Persist data even when container shuts down
      - ./scripts/init.sql:/docker-entrypoint-initdb.d/init.sql
  redis:
    image: redis:latest
    command: redis-server
    volumes:
      - redis:/var/lib/redis
      - redis-config:/usr/local/etc/redis/redis.conf
    ports:
      - 6379:6379
    networks:
      - redis-network

volumes:
  my_postgres_data:
  redis:
  redis-config:

networks:
  redis-network:
    driver: bridge
We have the Redis image, additional volumes for the configuration, the Redis itself, and a network to access it. This setup ensures the Redis service runs with persistent storage and is accessible via the specified network and port configuration. We haven't changed the default port, so if you have locally Redis installed and started it would be a good time to stop it, or change the port.
To finish our setup, navigate to your environment file .env and add the following lines.
REDIS_HOST=localhost
REDIS_PORT=6379
Run docker compose up and you should have a fully running Postgres and REDIS. Run your project in another terminal with npm run start:dev and there should be no more errors!
Example of using REDIS client
As we don't have a real-life application yet, let's go to our User Resolver or any other service you like and inject the client.
Import the Redis Module, into the User Module for this to work.
constructor(
  @Inject(REDIS_CLIENT) private readonly redisClient: Redis,
) {}
This is really all needed. Now you can utilize the client with any functionality provided by it. A simple example would be to get the ratings from the cache with the resolve field. Let's do that.
import { Int, ResolveField, Resolver } from '@nestjs/graphql';
import { User } from './entities/user.entity';
import Redis from 'ioredis';
import { Inject } from '@nestjs/common';
import { REDIS_CLIENT, REDIS_KEYS } from '../redis/redis.constants';

@Resolver(() => User)
export class UserResolver {
  constructor(
    @Inject(REDIS_CLIENT) private readonly redisClient: Redis,
  ) {}

  @ResolveField(() => Int, { nullable: true })
  async rating() {
    const userId = 1;
    const rating = await this.redisClient.get(
      `${REDIS_KEYS.userRating}${userId}`,
    );
    return rating ? parseInt(rating, 10) : null;
  }
}
Normally we'll take the userId from the parent object, which will be the User. In addition, a fallback to calculate and set the rating in the cache would be good. The whole code from the tutorial is available in the branch redis-integration here. You can find the whole growing starter in the master branch.
To wrap it all up, don't use REDIS if it's not needed for the scale of your project. If you decide to use it, just be smart and don't overengineer it.
If any of this is interesting or helpful, subscribe to my newsletter at the bottom of the page and receive short emails about new articles. A follow on Twitter/X or LinkedIn is highly appreciated too!
Related articles
How to add REDIS in Coolify with NestJS?
Adding REDIS is a performance boost, and you can easily do so in Coolify.

How to Build Robust Integrations for your Application? The production way!
Third-party integrations sound easy, but doing them in a way to not degrade the performance of your app is hard.

TypeORM Migrations Explained - Example with NestJS and PostgreSQL
Learn to handle TypeORM migrations in all scenarios. Understand which command to run and when.
Create Production Dockerfile with Migrations - NestJS with TypeORM and Docker
Build a robust structure of NestJS Dockerfile with running migrations and be ready to deploy anywhere.
Setup a NestJS Project with GraphQL, TypeORM - Production Ready
Build a scalable structure with NestJS, GraphQL and TypeORM with PostgreSQL for your database. Be production ready, and ready to scale.
My Newsletter
Subscribe to my newsletter and get the latest articles and updates in your inbox!